Introduction (#)

Vicodin - Medical Equipment Store Shopify Theme 2.0


  • Exclusively by: TunaTheme
  • E-mail: TunaTheme@gmail.com

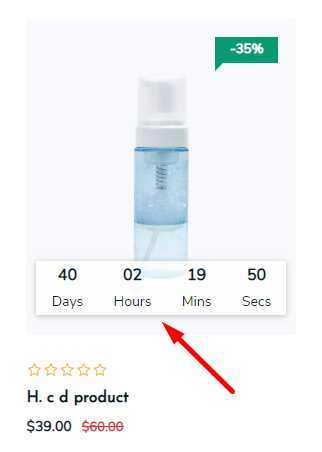
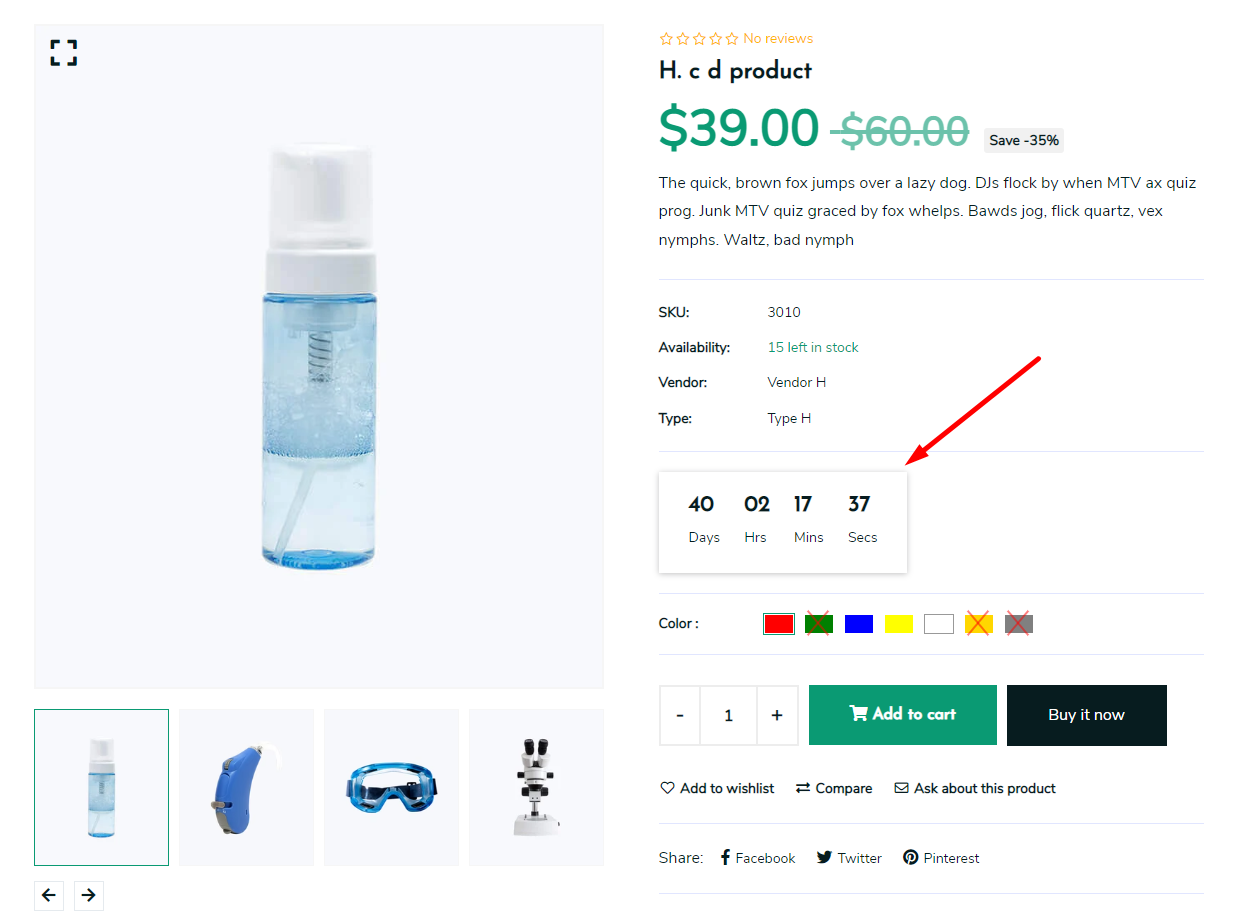
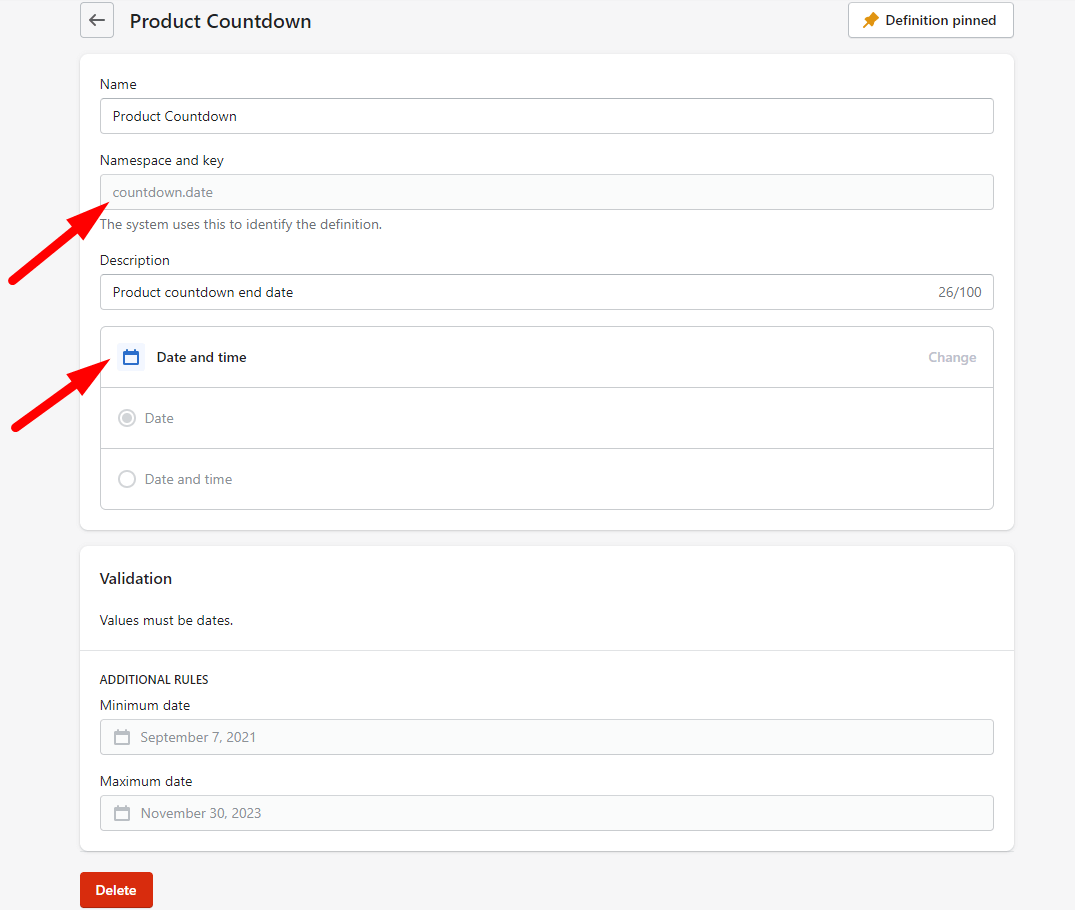
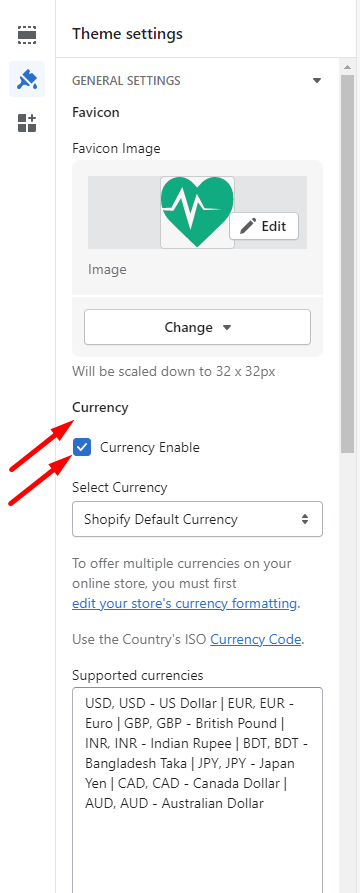
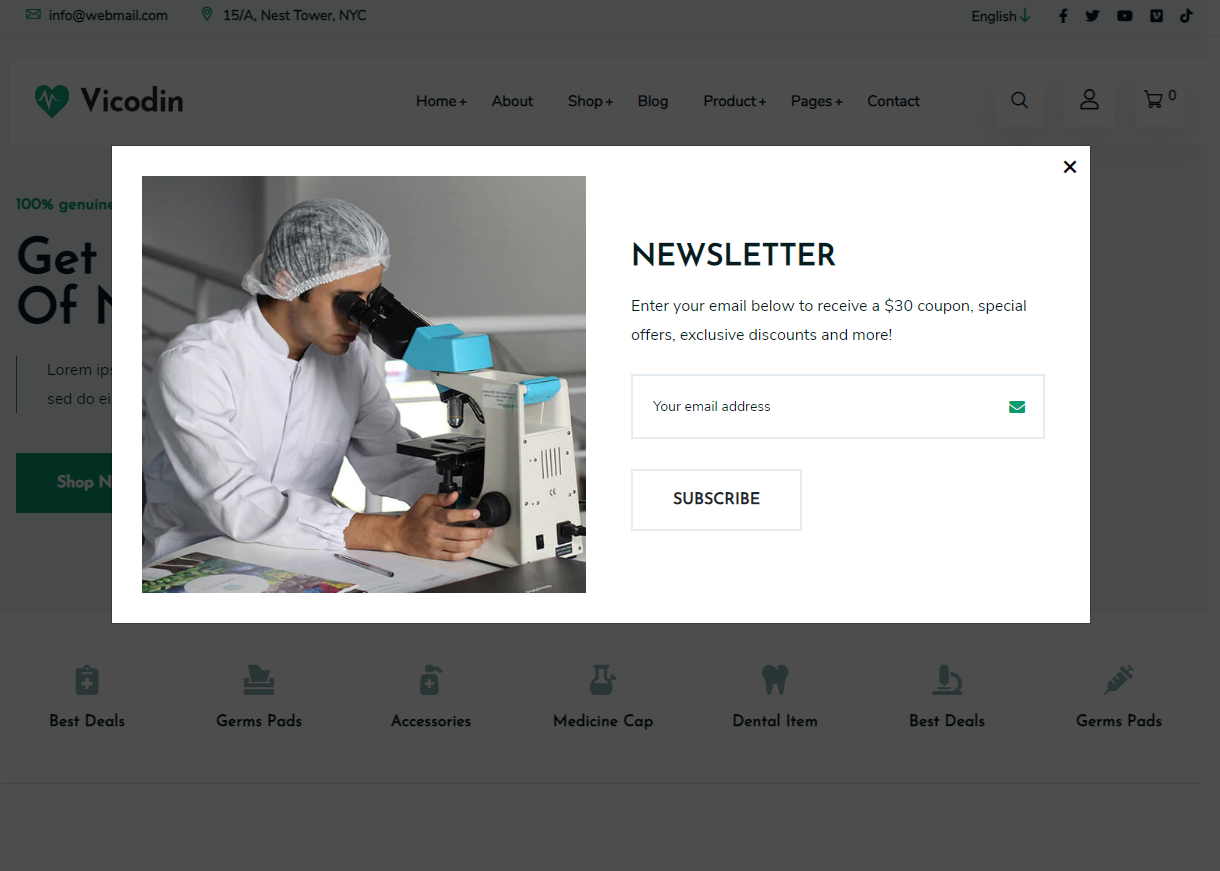
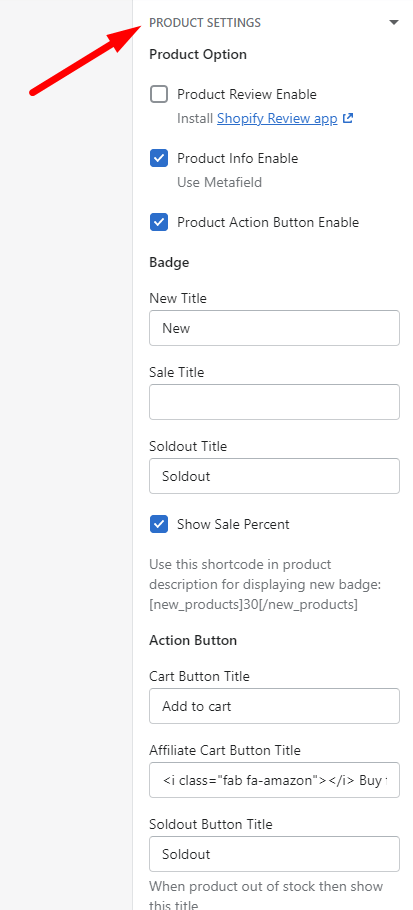
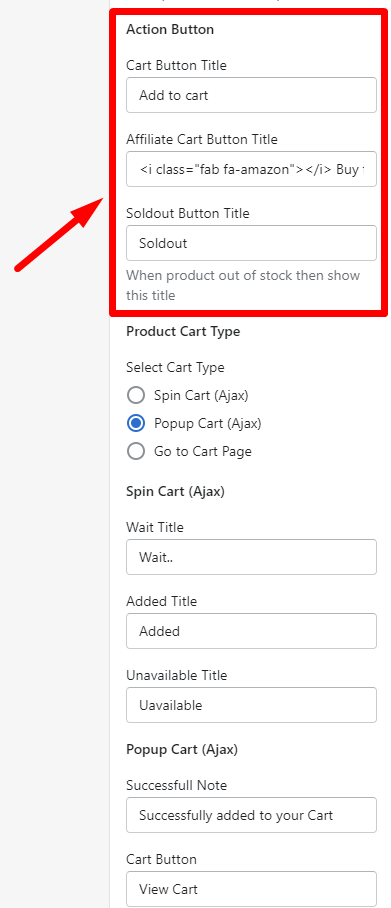
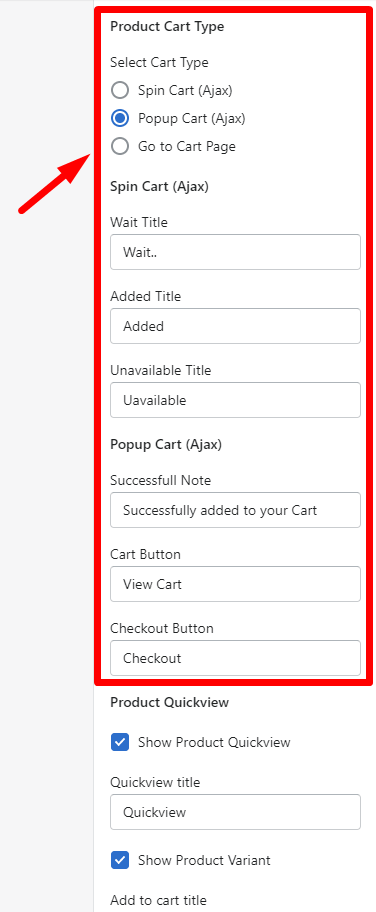
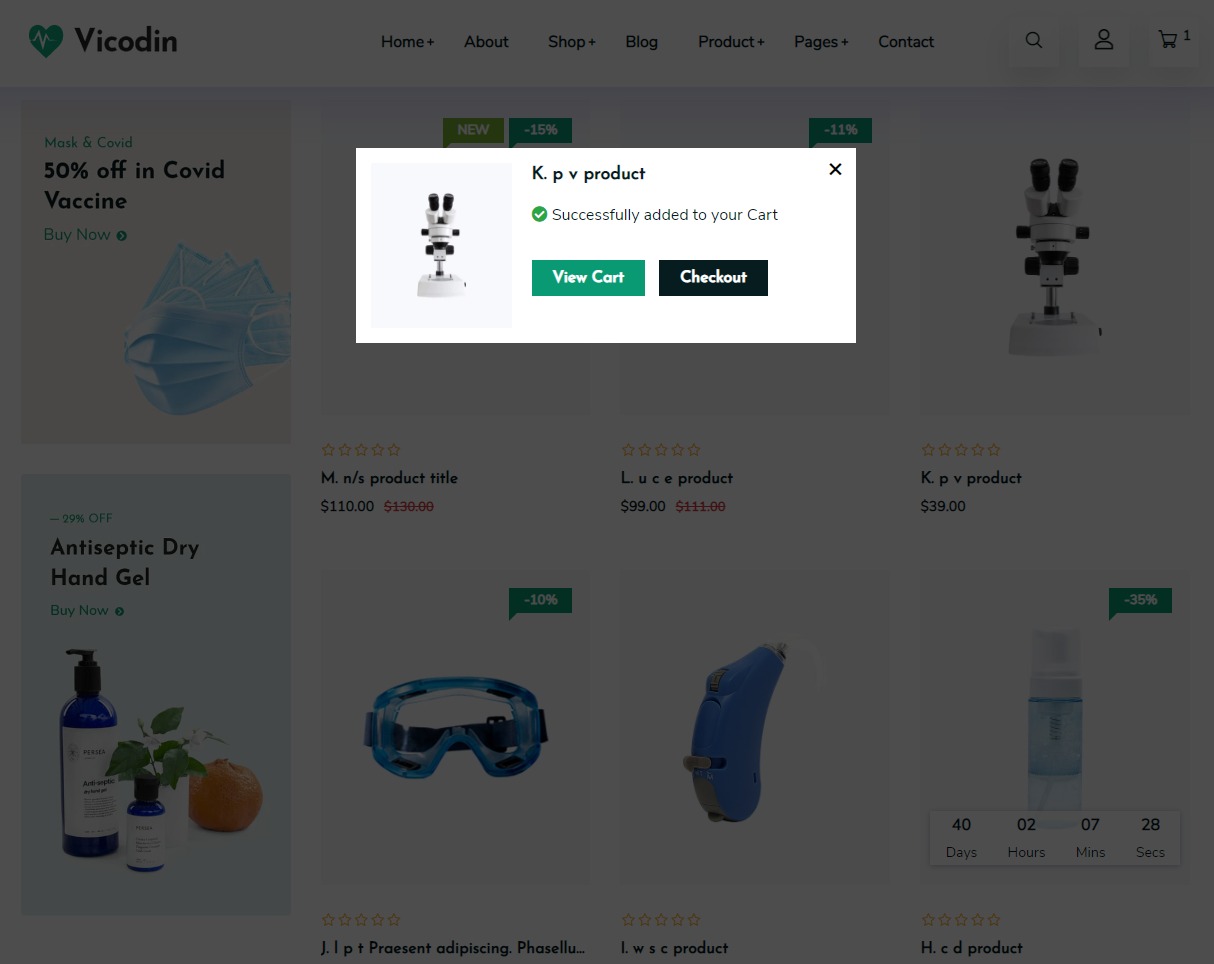
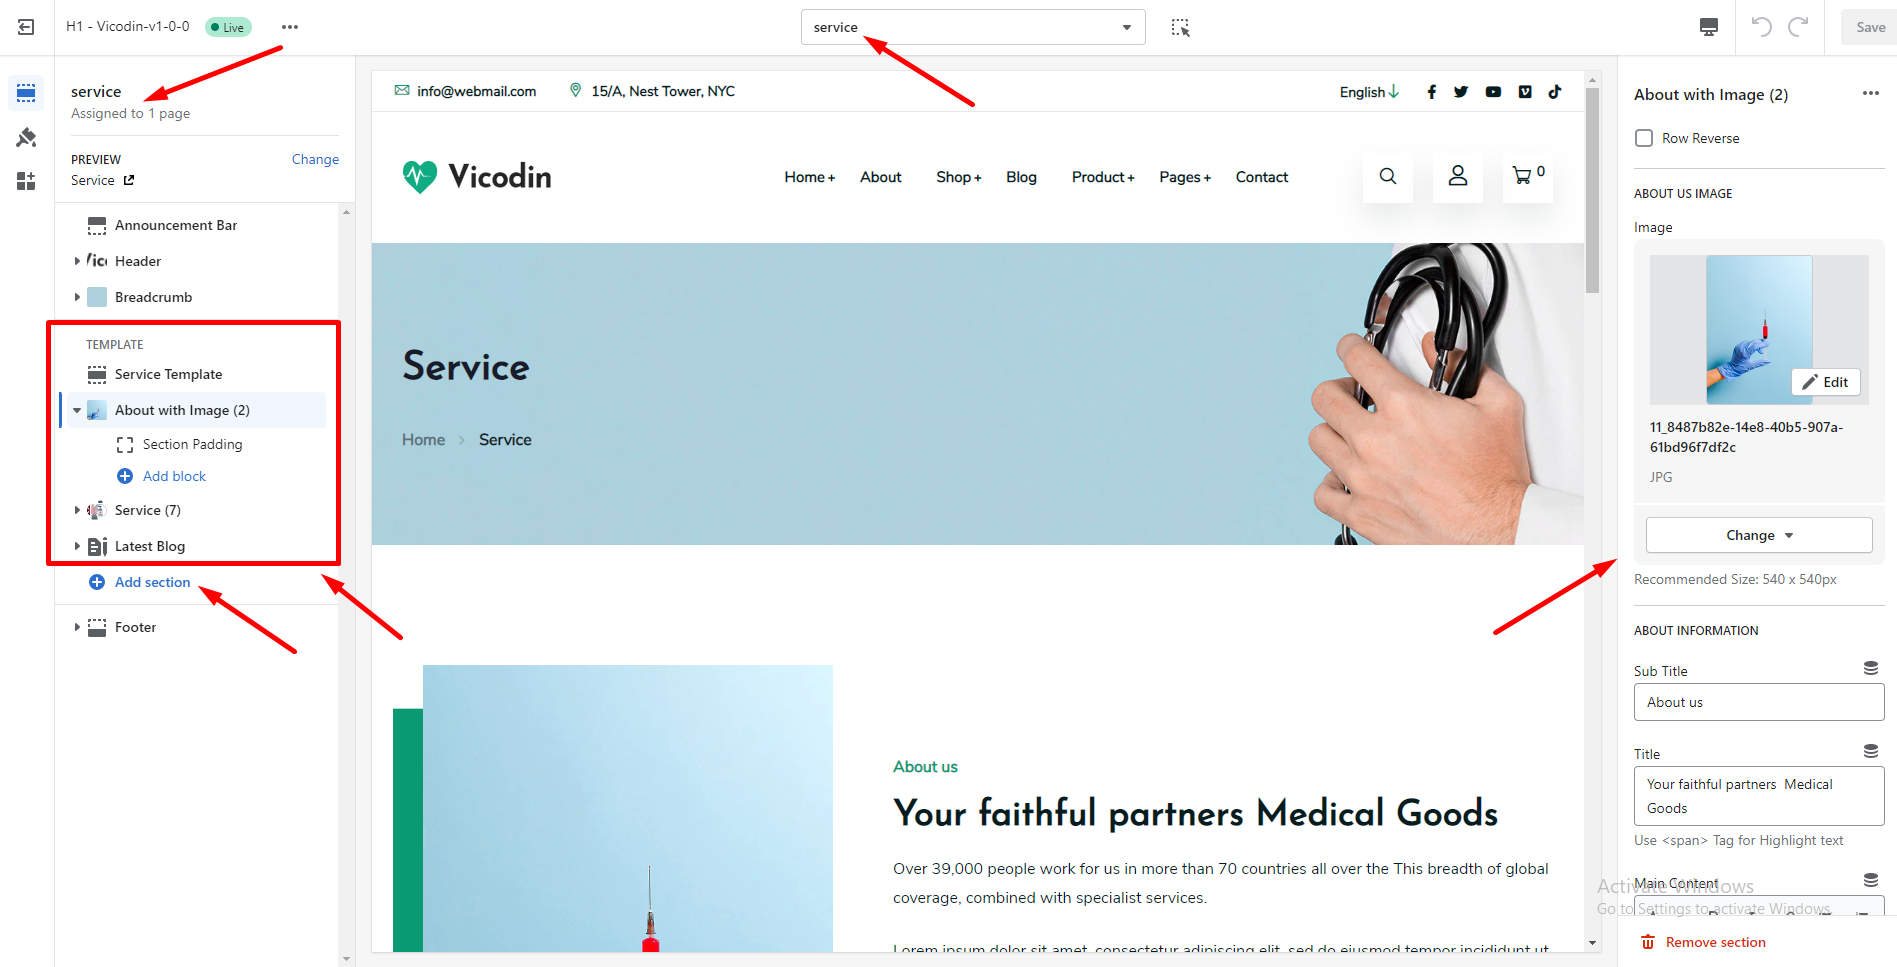
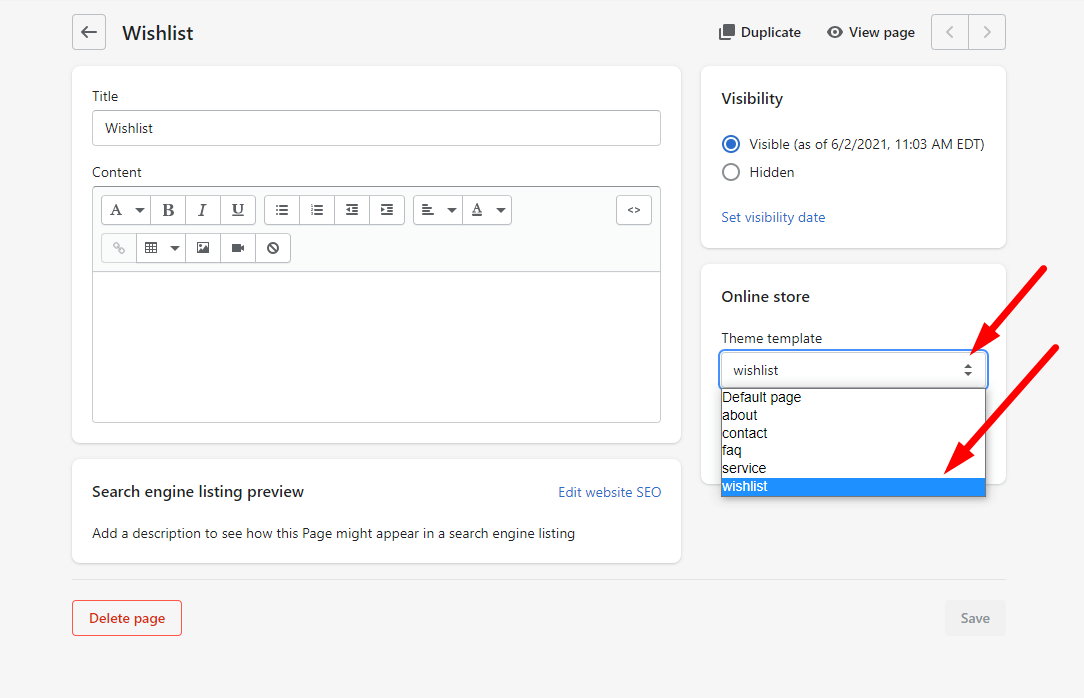
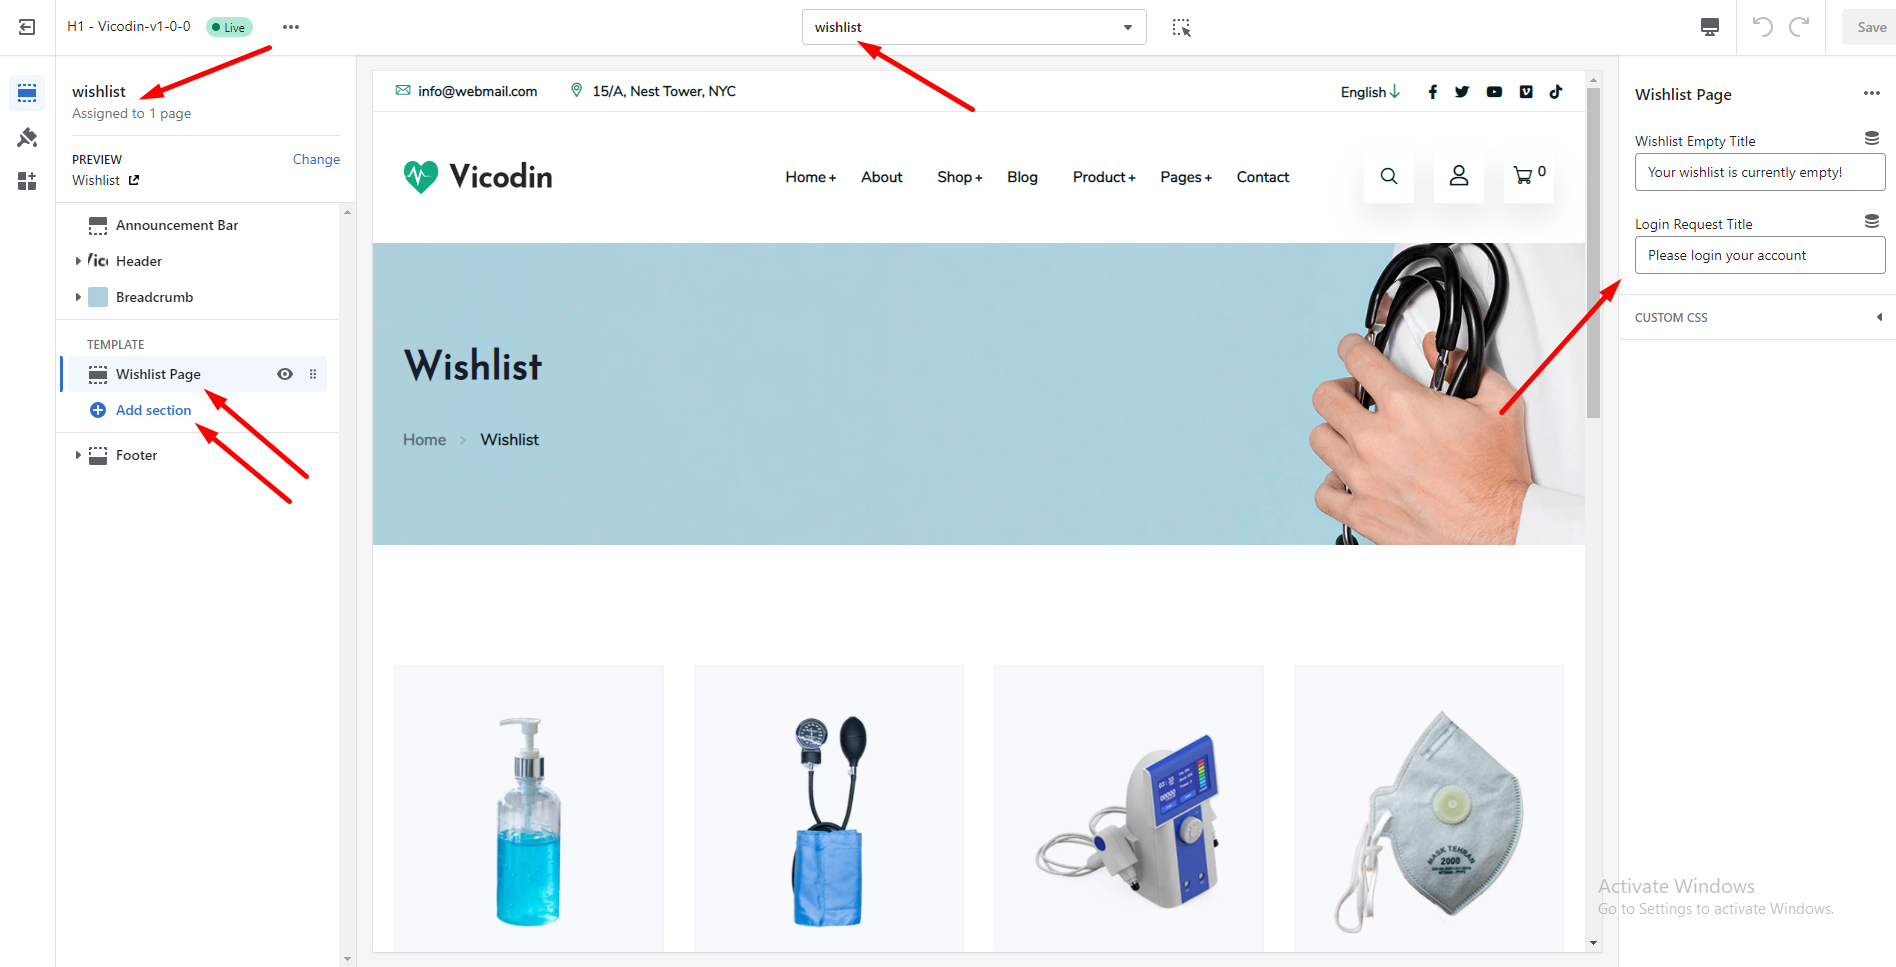
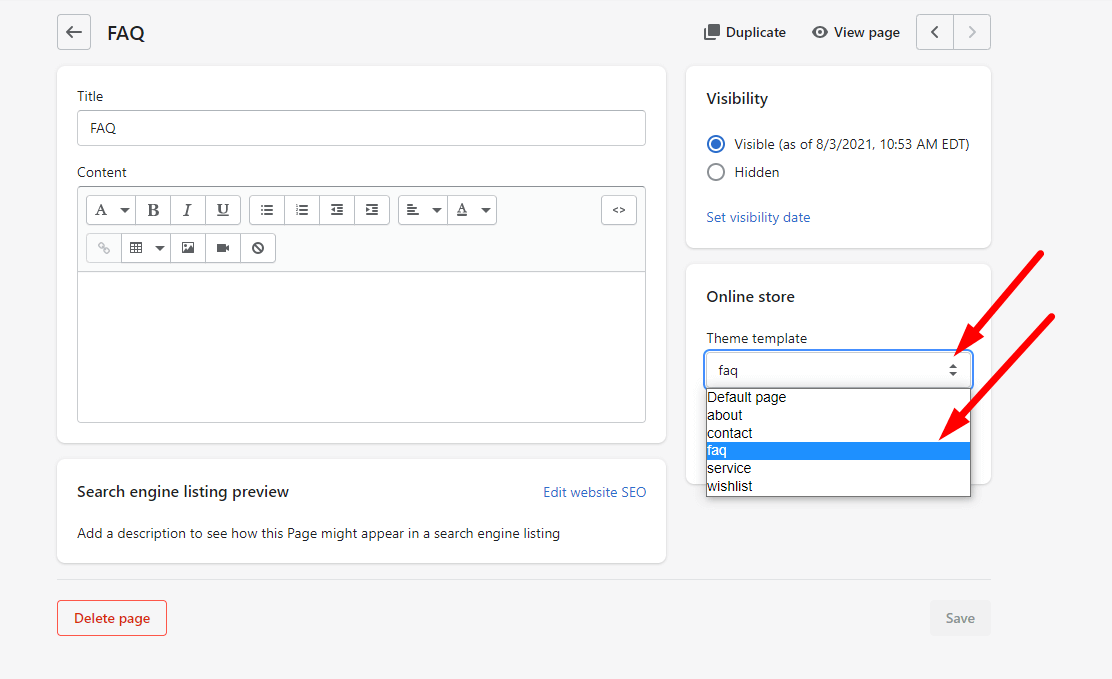
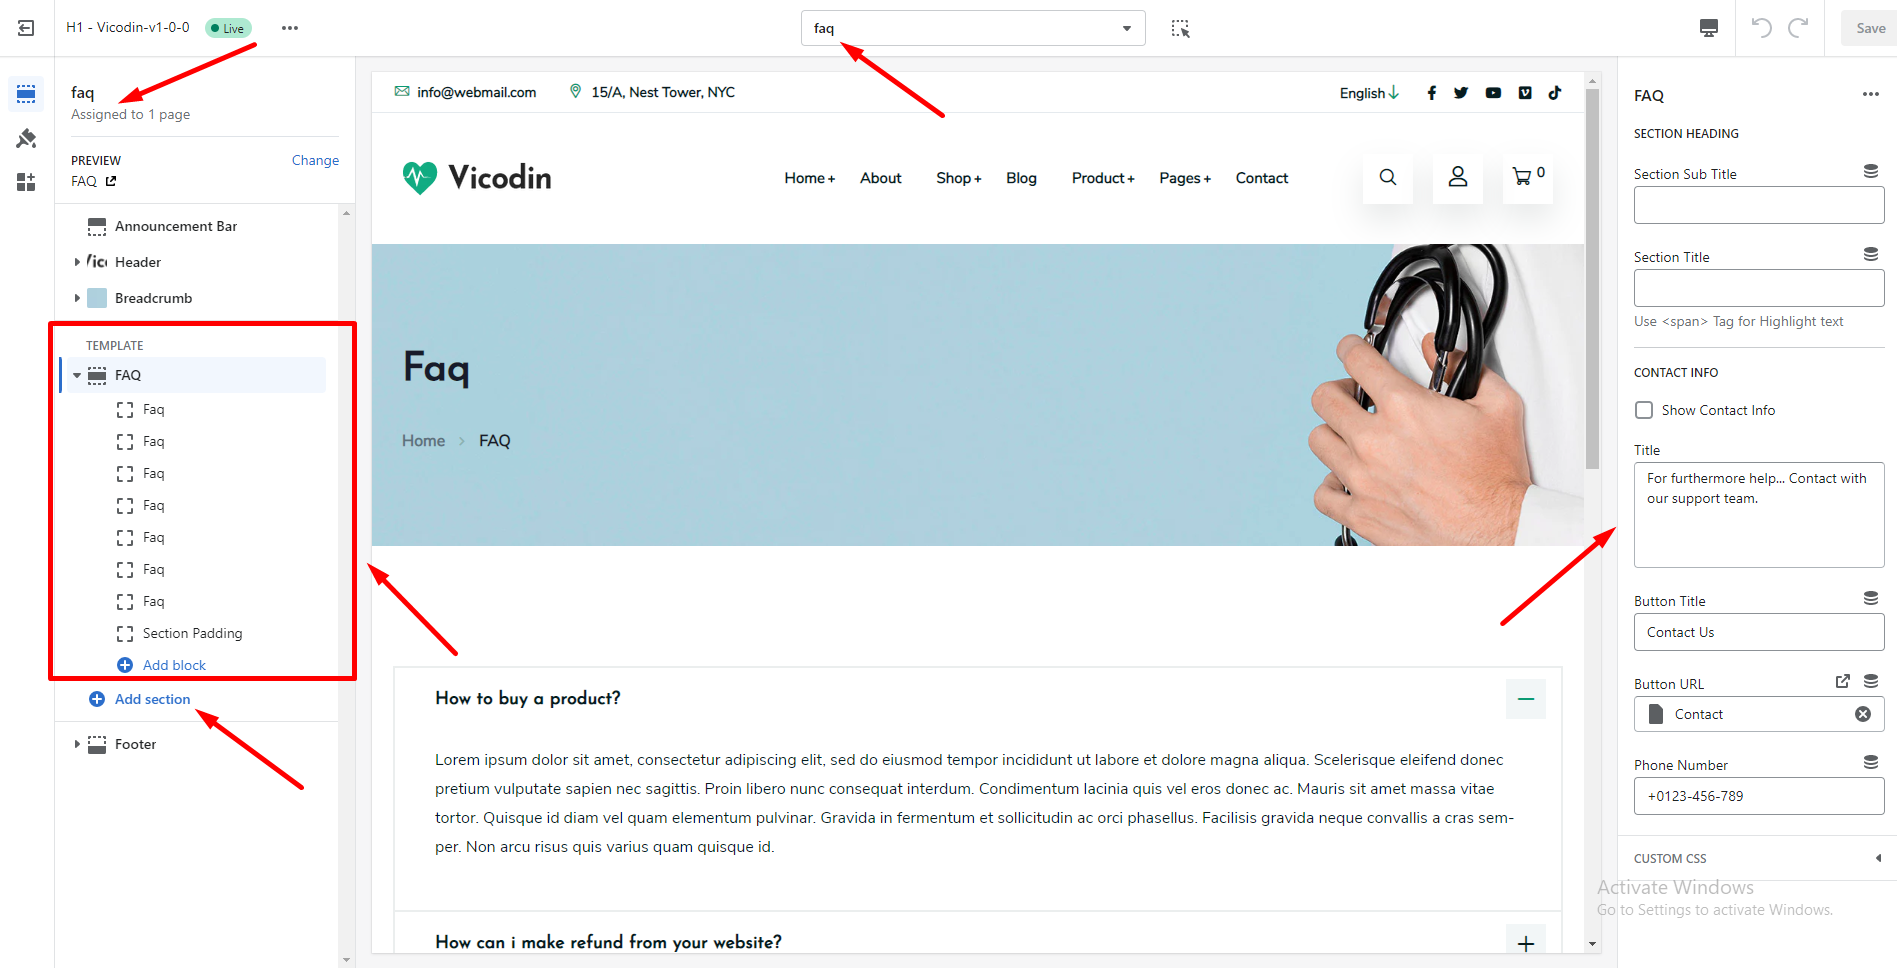
Vicodin – the fastest, most fully customizable, and high-converting Shopify theme. Get the most out of your online store with our important features like Featured Collection, Featured Collection List, Tab with Product, About with Image, Product Compare, Product Media, Product Zoom, Product Image Popup, Ajax Product Inventory, Product Variants, Dynamic Checkout Button, Product Share, Product Information Tab, Product Recommendation, team member, Testimonial, Call to Action, Newsletter Subscription, Service, and Brand Logo, Multi-currency, Multi-language support, Ajax cart, wishlist, mini cart drawer, and much more.

Further, if you need any kind of help then we are ready to provide full support. Please, contact with us: TunaTheme@gmail.com

Key Features (#)

  • Online Store 2.0 Integrated
    • Sections on every page
    • Add Section on every page
    • Sections drag and drop on every page
    • Theme app extensions with app blocks
    • Supports Shopify latest technology
  • Quick Demo Install
  • Announcement Bar
  • Header (2 styles)
    • Top Bar
    • Dropdown Menu
    • Mega Menu
    • Search Field
    • User Menu
    • Multiple Currency
    • Mini Cart Drawer
  • Hero Sections
    • Slideshow (2 styles)
    • Slideshow (Video)
    • Slideshow (Popup Video)
    • Hero Banner
    • Hero Banner (Popup Video)
  • Banner Sections
    • Banner with Schedule
    • Countdown Banner
    • Multiple Banner
    • Popup Video Banner
  • Collection Sections
    • Featured Collection
    • Featured Collection List
    • Tab with Product (2 styles)
  • About Sections
    • About with Contact
    • About with Image
    • Brand Logo
    • Our Journey
    • Team Member
    • Team Skill
    • Testimonial (3 styles)
  • Call to Action (3 styles)
  • Newsletter Subscription
  • Service Sections
    • Service (6 styles)
    • Service Appointment (2 styles)
    • Service Image (Portfolio)
    • Service Info Counter
    • Service with Image
  • Blog Sections
    • Latest Blog (2 styles)
    • Service Blog (2 styles)
  • Contact Sections
    • Contact Form
    • Contact Info (2 styles)
    • Google Map
  • FAQ Section
  • Product Options
    • Quickview
    • Add to Cart (Popup, Spin, Click to cart page)
    • Wishlist
    • Compare
    • Badge
  • Collection All Page
    • Collection Sidebar
    • Collection Sorting
    • Collection Grid/List View
  • Product Details Page
    • Product Media (Images, AR, 3D Models, Videos)
    • Product Zoom
    • Product Image Popup
    • Ajax Product Inventory
    • Product Variants (Swatch, Select Option)
    • Dynamic Checkout Button
    • Product Share
    • Secure Payment Gateway
    • Product Information Tab
    • Related Product
  • About Page
  • Service Page
  • Contact Page
  • Search Page
  • FAQ Page
  • Wishlist Page
  • Default Blog Page
  • Service Blog Page
  • Default Blog Details Page
  • Service Blog Details Page
  • Cart Page
    • Shipping Calculator
    • Cart Note
  • Footer
    • About
    • Blog
    • Contact Info
    • Menu
    • Newsletter
    • Time Schedule
    • Copyright
  • Breadcrumb
  • Typography
  • Color Option
  • Newsletter Popup
  • Preloader
  • Section Padding/Margin/Background Option
  • Back to top
  • Fully Responsive
  • Password Page

Theme Installation (#)

  • Theme Upload:

    • Unzip the downloaded file
    • Enter the Theme Files folder
    • Upload the theme file

      Theme upload
      Theme upload
    • From your Shopify admin, go to Online Store > Themes
    • In the Theme library section, click Upload theme
    • From the Upload theme window, click Choose File to select the ZIP file that you want to upload
    • Click Upload. The theme will be added to the Themes page of your admin

Demo Installation (#)

  • Demo Data Upload:

    • Open the downloaded file
    • Click on the Demo Data > Presets folder, then get all the demo folders
    • Enter the demo folder and select which you want to install
    • Get two files like index.json.txt and settings_data.json.txt

      Demo Installation
      Demo Installation
      Demo Installation
      Demo Installation
    • From your Shopify admin, go to Online Store > Themes
    • Find the theme that you want to edit, and then, click Actions > Edit Code
    • Open the index.json and settings_data.json file

      Demo Installation
      Demo Installation
    • Copy the index.json.txt code from Presets > Demo file like Home Style - 3
    • Paste it in code editor index.json file and click the Save button

      Demo Installation
      Demo Installation
    • In a same way, copy the settings_data.json.txt code and paste it in code editor settings_data.json file and click the Save button

Initial Setup (#)

  • Getting set up to start selling

    It's time to build your store! Because there are so many different ways that you can use Shopify, it's easy to wonder how to get started, or even to worry about forgetting key steps on the way to your first sale. This section of the Help Center outlines the most important tasks to get your Shopify business up and running as quickly as possible.

  • General Settings

    • From your Shopify admin, go to Settings > General
    • In the Store currency section, choose which currency want to use your store
    • If you want to use Currency picker to your store then replace these below code in the Currency Formatting
      Copy
      Copy

      Initial Setup
    • Click Save
  • Customer Accounts

    • From your Shopify admin, go to Settings > Checkout
    • In the Customer accounts section, choose the Accounts are optional or Accounts are required in customer account option

      Initial Setup
    • Click Save

Mega-Menu (#)

  • Create a Mega-Menu

    • From your Shopify admin, go to Online Store > Navigation
    • Click the name of your main menu
    • Choose one of the menu items to be the header for your mega-menu
    • Then add new drop-down menu under the selected menu item
    • Again add new menu items under the drop-down menu

      Navigation
  • Create a Mega-Menu with Image

    • Add collection link in the drop-down menu item which must have Collection image

      Navigation
      Navigation
      Navigation

Adding Products (#)

You can add or update information about a product such as its price, variants, and availability from the Products page in your Shopify admin.
Product image recommended size: 600 x 600px

Countdown Metafields (#)

  • Adding Metafield for Product Countdown

    • To showcase the product Countdown in product grid, use the Metafields

      Metafield
      Metafield
    • From your Shopify admin, go to Settings > Metafields
    • In the Manage metafields section, select the Product
    • Click Add metafield definition
    • Use this code in the Namespace and key field
      Copy

      Metafield
    • Slect content type Date and time
    • Click Save
  • Adding Metafield value in the selected Product

    • From your Shopify admin, go to Product
    • Select the Product which displying the Metafields
    • After that, get metafield option to add value

      Metafield
    • Set the product countdown ending date

Collections (#)

You can group your products into collections to make it easier for customers to find them by category.

Multi-Currency (#)

  • From your Store Customizer, go to Theme Settings > General Settings
  • Scroll down untill find the Currency and follow these instructions in this settings option
  • Don't forget to setup your store in Currecy Formatting

    Theme Settings

Color (#)

  • From your Store Customizer, go to Theme Settings > Colors
  • Enable the 'Color Enable'option and follow these instructions in this settings option

    Theme Settings

Typography (#)

  • From your Store Customizer, go to Theme Settings > Typography
  • Enable the 'Font Family Enable'option and follow these instructions in this settings option

  • Theme Settings

Newsletter Popup (#)

  • From your Store Customizer, go to Theme Settings > Newsletter Popup
  • Enable the 'Newsletter Popup Enable'option and follow these instructions in this settings option

  • Theme Settings
    Theme Settings

Product Settings (#)

  • From your Store Customizer, go to Theme Settings > Product Settings
  • Product global settings and many instructions are included here
  • Follow these instructions in this settings option

  • Theme Settings
  • Action button title option are included here

  • Theme Settings
  • 3 types of cart option are included here, you can choose any one
    • Spin Cart (Ajax) will add product to cart without loading page
    • Popup Cart (Ajax) will add product to cart without loading page, and display popup for cart notification
    • Go to Cart Page will add product to cart and go to cart page


    Theme Settings
    Theme Settings
  • Product Quickview, Wishlist, and Compare option are included here. Follow these instructions in this settings option

Pages (#)

If you have a Shopify online store, then you can create webpages in your Shopify admin. Webpages contain information that rarely changes or that customers will reference often.

About Page (#)

  • Go to Online Store > Pages
  • Click Add page
  • Enter a title for the page
  • Select 'about' in the Online store section, from the Theme template drop-down menu
  • Go to Customizer > Pages > About
  • You can add, remove, edit, and customize sections using the theme editor

    Pages
    Pages

Contact Page (#)

  • Go to Online Store > Pages
  • Click Add page
  • Enter a title for the page
  • Select 'contact' in the Online store section, from the Theme template drop-down menu
  • Go to Customizer > Pages > Contact
  • You can add, remove, edit, and customize sections using the theme editor

    Pages
    Pages

Service Page (#)

  • Go to Online Store > Pages
  • Click Add page
  • Enter a title for the page
  • Select 'service' in the Online store section, from the Theme template drop-down menu
  • Go to Customizer > Pages > Sevice
  • You can add, remove, edit, and customize sections using the theme editor

    Pages
    Pages

Wishlist Page (#)

  • Go to Online Store > Pages
  • Click Add page
  • Enter a title for the page
  • Select 'wishlist' in the Online store section, from the Theme template drop-down menu
  • Go to Customizer > Pages > Wishlist
  • You can add, remove, edit, and customize sections using the theme editor

    Pages
    Pages

Faq Page (#)

  • Go to Online Store > Pages
  • Click Add page
  • Enter a title for the page
  • Select 'faq' in the Online store section, from the Theme template drop-down menu
  • Go to Customizer > Pages > Faq
  • You can add, remove, edit, and customize sections using the theme editor

    Pages
    Pages

Collections (#)

  • Go to Online Store > Collections > Default collection
  • You can control Sidebar position (left, right, remove)
  • Add & remove, drag & drop block types like Search, Category, Vendor, Type, Color, Size, Collection, Tag, Menu, and Banner in the Sidebar
  • You can controll product column and limit also

Product (#)

  • Go to Online Store > Products > Default collection
  • Add & remove, drag & drop block types like App, Title, Price, Description, Countdown, Variant, Action Button, Share & Payment in the Prodcut Section
  • Add & remove, drag & drop block types like Description, Review, Custom Tab, Unique Tab
  • You can controll Related Product also

Blogs (#)

  • Go to Online Store > Blogs > Default collection
  • You can control Sidebar position (left, right, remove)
  • Add & remove, drag & drop block types like Search, Recent Post, Archive, Social Media, Tag, Menu, and Banner in the Sidebar
  • You can controll blog column and limit also

Article (Single Blog) (#)

  • Go to Online Store > Blog posts > Default blog post
  • You can control Sidebar position (left, right, remove)
  • Add & remove, drag & drop block types like Search, Recent Post, Archive, Social Media, Tag, Menu, and Banner in the Sidebar
  • You can controll blog form also

404 Page (#)

  • Go to Customizer > Others > 404 page
  • You can add, remove, edit, and customize sections using the theme editor

    404 Pages

Password Page (#)

  • From your Shopify admin, go to Online Store > Preferences
  • Scroll to the Password protection area, and check Enable password
  • Go to Customizer > Others > Password
  • You can add, remove, edit, and customize sections using the theme editor

    Password Pages Password Pages

Support (#)

Thanks for purchasing our theme. A 24/7 support system is available.

Feel free to contact us at any time. TunaTheme@gmail.com